
Browse all guides
ARRANGE & STYLE
Colors & backgrounds
Choose the color of the thing, the space behind it, or the whole widget.
In this guide
Which part do you want to color?#
White words, a colored card behind those words, and the widget’s overall background are three different things. Select the words to change their text color. Select their Background tool to change the card behind them. Select the widget background to change the whole surface.
A solid color uses one color throughout. A gradient blends from one color to another; its angle changes the direction of that blend. Use the light and dark previews to check that the words stay readable.
Open a saved widget in Library, then tap Design Visually. The next sections show which toolbar button controls each kind of color.
Change a layer’s color#
The color control depends on what you select: Text → Color for text, Color for an icon or line, Shape → Fill for a shape, and Progress → Colors for a progress layer.
Choose a preset or your own color. When Gradient is offered, set its two colors and angle. Text color controls can also offer Different color in light mode.
Give a layer a background#
For a layer with a Background tool, open it and choose Fill. Inside that Background panel, tap Rounded corners to soften the box, or Room inside to add space around its contents. Drag the ruler for the amount you want.
Frosted blurs what is behind the layer. On a list, these background controls apply to each row. Not every kind of layer has a Background tool.
Change the widget background#
Open Layers and tap the Background entry at the bottom of the list. Then tap Background in the toolbar. In the wider editor layout, Background is also available when nothing is selected.
- Dark mode fill
- Set the background for the dark preview.
- Light mode fill
- Set a separate light background, or choose Same as dark.
Use the moon or sun in the canvas controls to check both appearances.
Make the widget see-through#
A see-through widget shows your wallpaper behind it, like glass, so it seems to sit right on your Home Screen. iOS doesn’t let a widget see the wallpaper, so the app uses a screenshot of yours.
Choose See-through
Open the widget background as above and tap See-through beside the two fills.
Take a screenshot
On your Home Screen, touch and hold until the apps jiggle. Swipe to the last page, the empty one, and take a screenshot.
Add your wallpaper
Back in the editor, tap Add your wallpaper and choose that screenshot. Many wallpapers change in dark mode: switch your iPhone over and add that screenshot too, or tap Same as dark or Same as light if yours doesn’t change.
Tell the widget where it sits
Save, put the widget on your Home Screen, then touch and hold it and tap Edit Widget. Set Position on screen to where it sits, so its piece of wallpaper lines up.
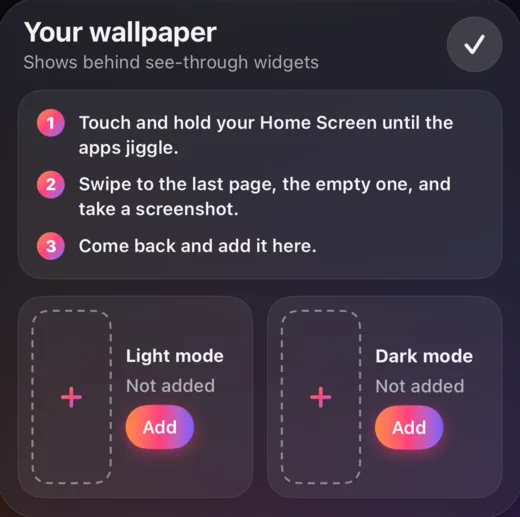
The app walks you through the screenshot.
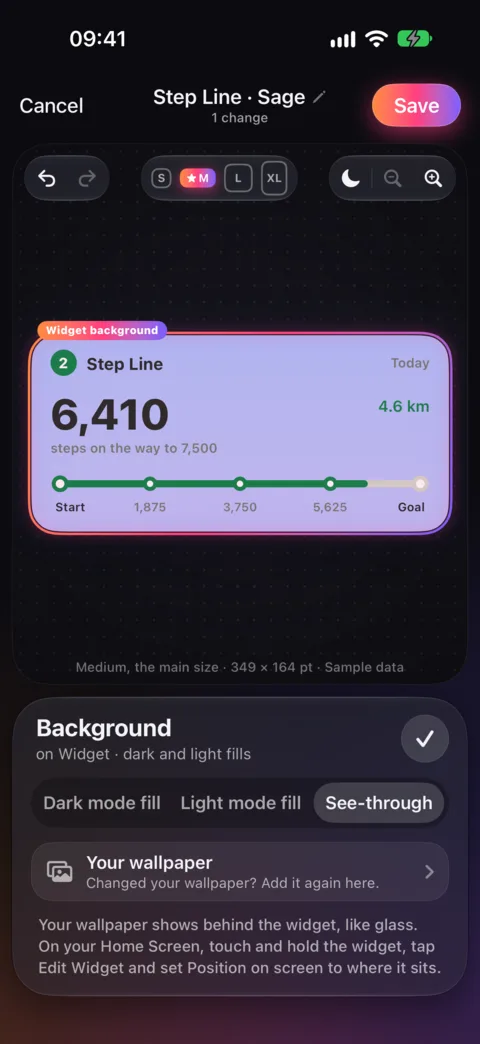
The wallpaper shows behind the widget · example wallpaper.
Until you add a wallpaper, the widget shows its fill. Changed your wallpaper? Add the new screenshot in the same place. See-through is offered on iPhones whose Home Screen layout the app knows.
Use a picture behind everything#
Add a photo, select it, then choose Photo → Fit → Fill the widget. This puts it behind the other layers. With the photo selected, use Photo → Darken if the text is difficult to read. See photo controls.
Checked against the app · October 21, 2026.
Screenshots use example data or the app’s test image.